How to Use a Putting Mirror to Improve Your Stroke

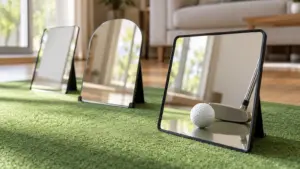
Learning how to use a putting mirror starts with setting it flat on a straight 6-foot putt, securing it with two tees, and checking your eye position, shoulders, and putter face in the reflection. If you use the Sight Line model, place it 8-10 feet from the hole and aim its center black line at the target.
How do you use a putting mirror?
Quick answer: Set the mirror flat on a straight putt, secure it with tees, and line up its markings with your target. The distance depends on the model: 6 feet for the Groove and 8-10 feet for the Sight Line. Check your reflection before each stroke, adjust until it matches, then stroke without changing that setup.
- Lay the mirror flat on a straight putt at the distance for your model: 6 feet on the Groove or 8-10 feet on the Sight Line.
- Secure it with tees, two on the Groove, so it stays put.
- Aim the markings at your target: the putter face on the Groove’s red line, or the Sight Line’s center black line at the hole.
- On the Sight Line, seat the ball in its U-shaped cutout.
- Check the reflection: eyes centered over the center line, shoulders parallel, and putter face square to the target.
- Adjust your stance, grip, or putter until the reflection matches those checks, then stroke without changing that setup.
Set Up and Practice With a Putting Mirror
Set the mirror on a flat, straight putt, then check your setup in its reflection before every stroke. The reflection shows whether your eyes, shoulders, and putter face match the same picture each time.
| Mirror | Putt distance (ft) | Secured with |
|---|---|---|
| Groove Putting Mirror | 6 | Two tees |
| Sight Line Mirror | 8-10 | Tees |
- Lay the mirror flat on a straight putt at the distance listed above.
- Secure it with tees so it stays put.
- Line up the mirror’s markings with your target. On the Groove mirror, align the putter face with the red line. On the Sight Line, point the center black line at the hole or practice target.
- On the Sight Line, set the ball in its U-shaped cutout.
- Take your putting stance and check the reflection. Your eyes should sit centered over the center line, either directly over the ball or just inside it. Your shoulders should look parallel, and the putter face should look square to the target.
- Adjust your stance, grip, or putter until the reflection matches those checks.
- Stroke the ball toward the target without changing that setup.
Use the distance in your own mirror’s instructions so the markings line up with the target you’re checking.
What Should You Check in the Reflection?
Check three things in the reflection: your eye position over the ball, your shoulder alignment, and whether the putter face looks square to the line. The markings you check against depend on your mirror, so match each check to the lines printed on yours.
- Eye position: On EyeLine’s Groove mirror, center your eyes over the center line. On MG Golf’s Sight Line, position your eyes over the ball. In EyeLine’s Mirror and Gate Drill, your eyes can sit directly over the ball or just inside it.
- Shoulder alignment: Check that your shoulders look parallel in the reflection, using the mirror’s alignment lines as your reference.
- Putter face: Confirm the face looks square to the target line on the Groove mirror. On the Sight Line, align the putter to the gate with a square face.
Note
EyeLine’s Groove mirror uses a red target line and a center line, while MG Golf’s Sight Line uses a center black line and a U-shaped ball cutout, so the lines you check differ by model.
Treat that position as a setup you can repeat, not as a universal target. If the reflection shows your shoulders or putter face out of line with the markings, change your setup until they match, not the mirror’s position on the green.
Look at the reflection before you start the stroke, and keep your head still while you check. Moving your head changes the eye position you just confirmed, so the check no longer tells you anything useful.
Practice Short Putts Without Losing Alignment
Start with short, straight putts, and lock in one setup before you work on the stroke. Use a straight putt about 4 to 8 feet long, the range the Mirror & Gate Drill suggests. Each time you set up, check the same three points in the reflection: your eyes centered over the center line, your shoulders parallel to the line, and the putter face square to the target. If one of those points moves, reset your setup before you hit the next putt.
Work through the progression in this order:
- Hit short, straight putts, setting up the same way on every ball.
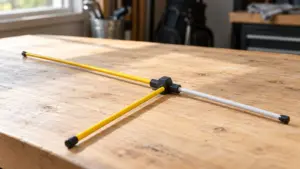
- When the setup feels repeatable, add a putter gate and make smooth strokes through it without a ball first.
- Repeat the stroke with a ball, keeping the same eye position, shoulder line, and face angle.
The gate ties the stroke to the setup you just built. It’s meant to encourage center-face contact and a square path through the four inches around impact. If the ball starts off line, you can check the reflection first to see whether the setup changed or the stroke did.
Note
Eye position may sit directly over the ball or just inside it, so pick one spot and keep it for the whole session.
Stay with the same short putt until your setup looks the same from one ball to the next. Keep the same checkpoints as you add the gate and the ball, so any change in your putts comes from the stroke itself, not from a new setup.
Avoid Common Putting-Mirror Mistakes
Three setup errors undo most of the value of a putting mirror: an uneven surface, a guide aimed off your start line, and reflection checks made before the ball is in position. Fix placement first, then judge your stroke.
- Uneven surface: A mirror that rocks or tilts changes the reflection, so your eyes and putter face can look wrong even when they’re right. Set it flat on the putting surface and secure it with two tees.
- Guide aimed off the line: The center black line is meant to point at the hole or practice target. If you line up that line beside your intended start line, every rep trains a stroke that starts in the wrong place.
- Adjusting before checking the ball: On the Sight Line, the reflection only tells you something useful once the ball sits in the U-shaped cutout. If the ball is off, correcting your eyes or putter face fixes the wrong problem.
Run the checks in a fixed order. Confirm the ball is seated in the cutout, then look for your eyes over the center line, shoulders parallel, and the putter face square to the target. Change one thing at a time, and recheck the reflection after each change.
Important
Start with a straight putt of about 6 feet, the length the manufacturer uses in its setup.
Keep the tees in the same holes each session so the mirror returns to the same spot. A small shift in placement changes the reflection, and you can end up chasing a problem that isn’t in your stroke at all.
Frequently Asked Questions
Can you use a putting mirror indoors?
Yes, you can. For indoor or turf practice, MG Golf says to insert the tees upside down through the underside of its mirror. Make sure the mirror sits flat on the surface before you check your reflection.
How often should you practice with a putting mirror?
Keep the Mirror & Gate Drill session to about 5 to 10 minutes. The first session should start with 25 to 35 putts on a straight 6-foot putt to build a repeatable setup. When you add the gate, aim for about 50 to 60 total reps across the session.
Do putting mirrors work for putts longer than 10 feet?
The setups above cover about 4 to 10 feet. One mirror is placed on a 6-foot putt, another sits 8 to 10 feet from the hole, and EyeLine’s drill uses 4 to 8 feet. Keep your practice putts in that range so the markings still line up with your target.
Can a putting mirror help fix pulled or pushed putts?
Yes, it can help you check the setup and face angle behind those misses. EyeLine says 93% of where a putt starts is determined by putter-face angle at impact. The reflection shows whether the face is square at setup, and the gate encourages center-face contact and a square path through impact.
Which putting mirror is better for beginners, Groove or Sight Line?
Start with the Groove mirror if you want a set first session, since EyeLine’s routine begins with 25 to 35 putts on a 6-foot putt. Choose the Sight Line if you want a U-shaped cutout that holds the ball in place before you check your reflection. Either works for beginners as long as you keep the same checkpoints every session.
Conclusion
If your setup drifts from ball to ball, stay on short, straight putts until the same checkpoints feel automatic, then add the gate. If the reflection looks right but the ball still starts off line, check the mirror’s placement and the aim of its guide line before you change your stroke. Next session, set the mirror on your practice green, secure it in the same tee holes, and hit a full set of straight putts while checking the same three points before each one.
Sources
- Groove Putting Mirror Videos (eyelinegolf.com)
- mggolf.com (mggolf.com)
- eyelinegolf.com (eyelinegolf.com)